


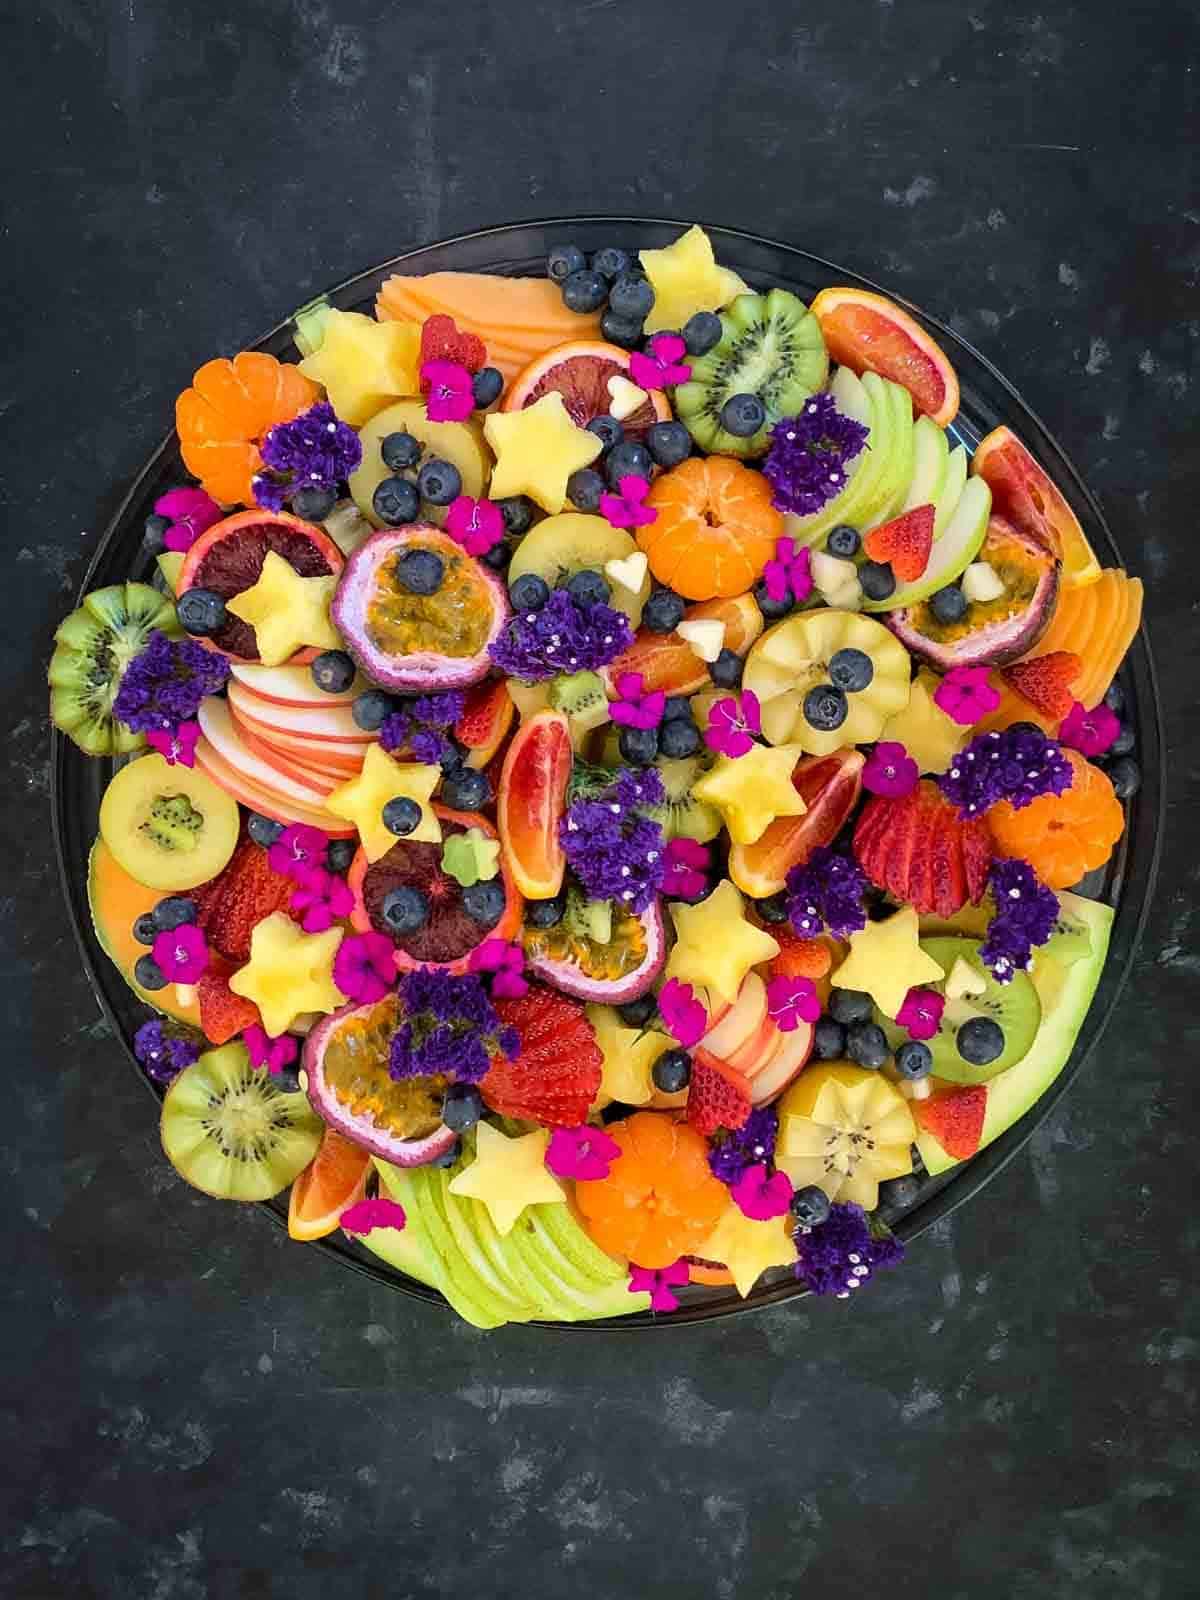
Fresh fruit platters and fruit trays don’t have to be boring and lifeless. There are many ways to make them look extraordinary and elicit those “wow” moments! We give you the ultimate fruit platter presentation ideas and how to put them together.

Jump to:
- Why You’ll Love This Fruit Platter
- What Kitchen Tools Do I Need For A Fancy Fruit Platter?
- How to Cut Kiwi Fruit Fancy?
- How To Use Shape Cutters for Fruit?
- How to Cut A Strawberry?
- How to Remove Piths From Mandarins?
- How To Cut Fruit Decoratively?
- Fruit Platter Presentation Ideas with Edible Flowers.
- Recipe Overview
- Ingredients
- Variations and Substitutions
- Instructions
- How To Cut Kiwi for Fruit Platter
- How to Make Strawberry Fans
- Prepare the Rest of The Fruit
- How to Assemble the Fresh Fruit Platter
- Frequently Asked Questions
- Recipe
Why You’ll Love This Fruit Platter
If you’re tired of creating fruit platters that look a little boring or if you’re just looking for some inspiration, these fruit platter presentation ideas are just what you need.
There are many ways you can make fancy fruit platters. All you need is a little imagination and understanding of what fruit can cut to make them look super fancy.
I have been making these fruit platters for many years, and they never get old. My friends and family never tire of them, and once you get the hang of these fruit presentation ideas, you’ll be amazed at how many different versions you can make.
What Kitchen Tools Do I Need For A Fancy Fruit Platter?
There are so many different fruit platter presentation ideas out there, but for the purpose of this specific recipe, I used 3 utensils that I have had in my kitchen for the longest time and definitely my go-to utensils when I’m making decorative fruit platters.
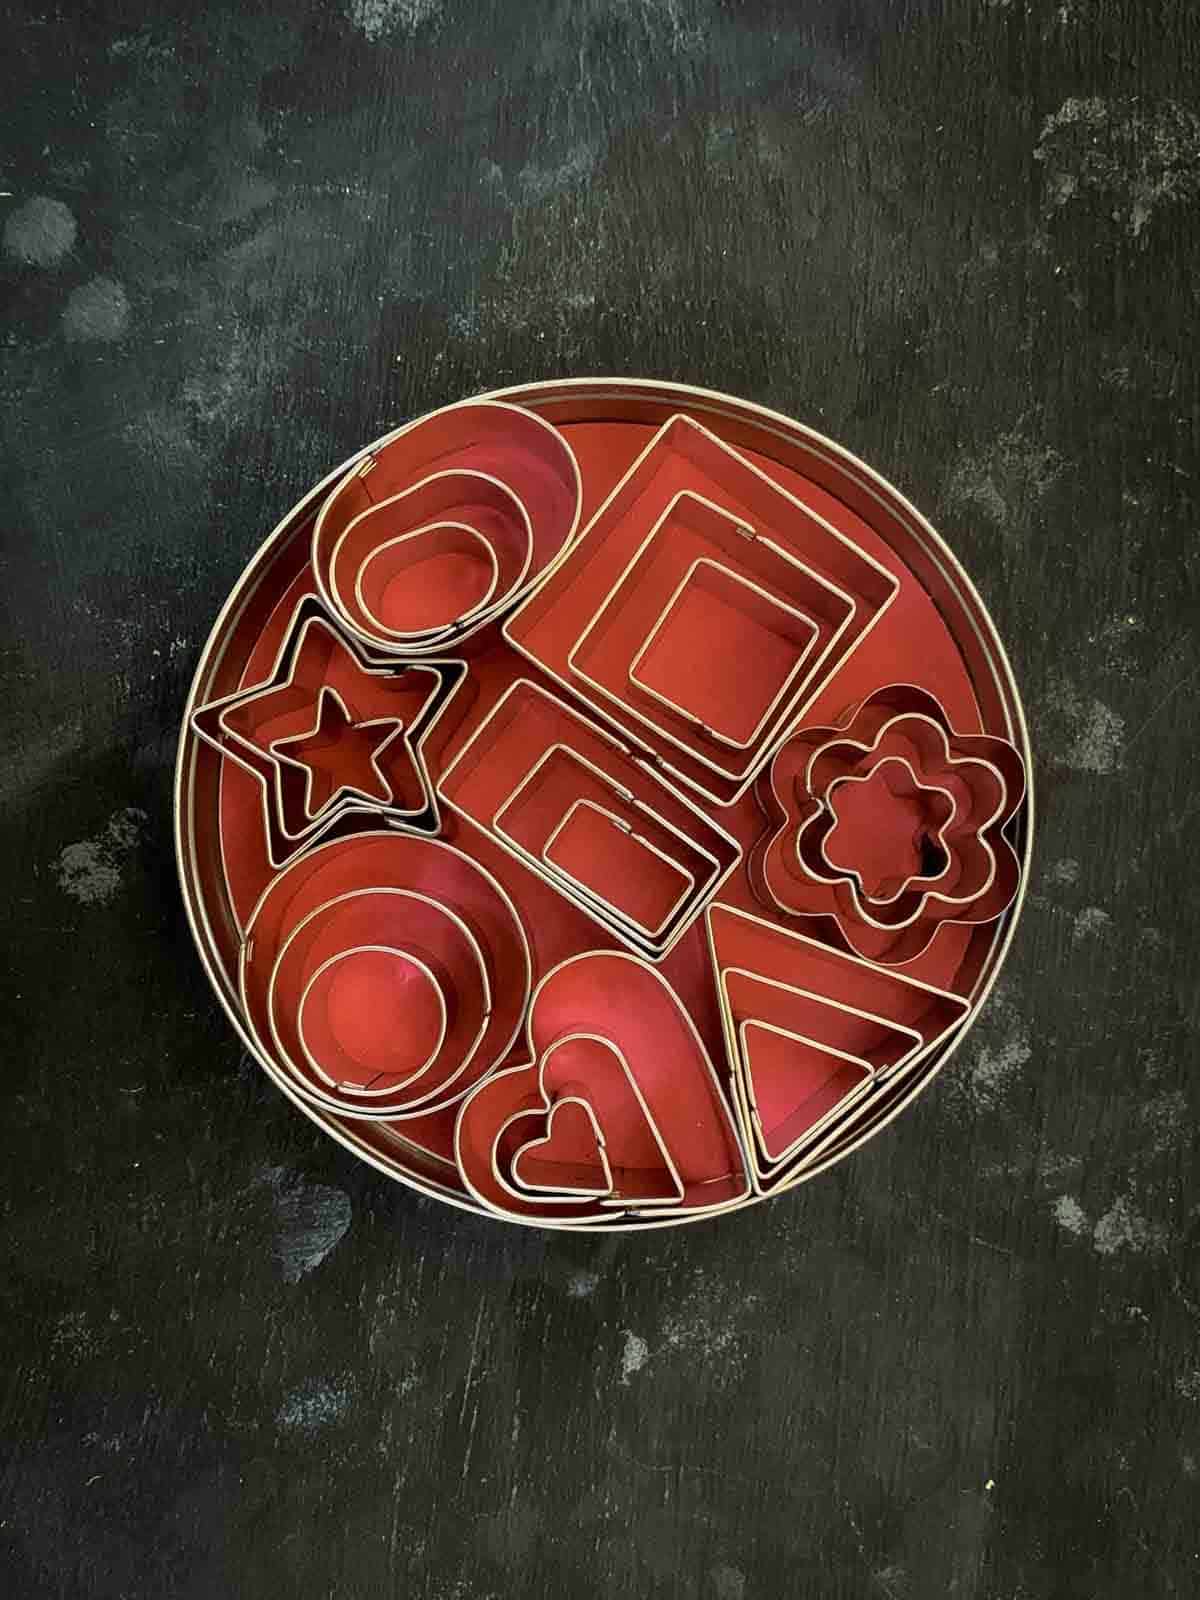
Cookie cutters: Cookie cutters make for the best shape cutters for fruit. I bought myself a small set of cookie cutters in generic shapes but of varying sizes. I also have Christmas themed cookie cutters for when I make Christmas fruit platters.
It is incredible how people are always commenting how cute a piece of fruit is just because it’s been cut into the shape of a heart or star. The kids love the fruit which are in tiny shapes and they tell me they taste better. LOL!
Melon baller: I have a double-ended melon baller of 2 different sizes. And although they are known as melon ballers, I don’t only use them for melons. They can, of course, be used to ball any fruit that may be soft enough.
I tend to use the smaller end more often as it reduces wastage, and also, some fruits are too small to use the big scoop, e.g. dragon fruits and kiwi fruits.
Small sharp knife: Although this may sound like a no-brainer, it is essential to have one small enough to use for the smaller pieces of fruit if you wish to make a certain cut.
Some fruit may be soft, and therefore a very sharp paring knife is vital to ensure you don’t inadvertently squish the fruit because you’re unable to cut through it easily.
How to Cut Kiwi Fruit Fancy?
I’m sure you’ve seen kiwi fruit cut into a floral shape, and this simple fruit platter presentation idea is easy to do and they look so gorgeous. Partly because the black seeds against the green or gold coloured flesh in itself are so pretty.
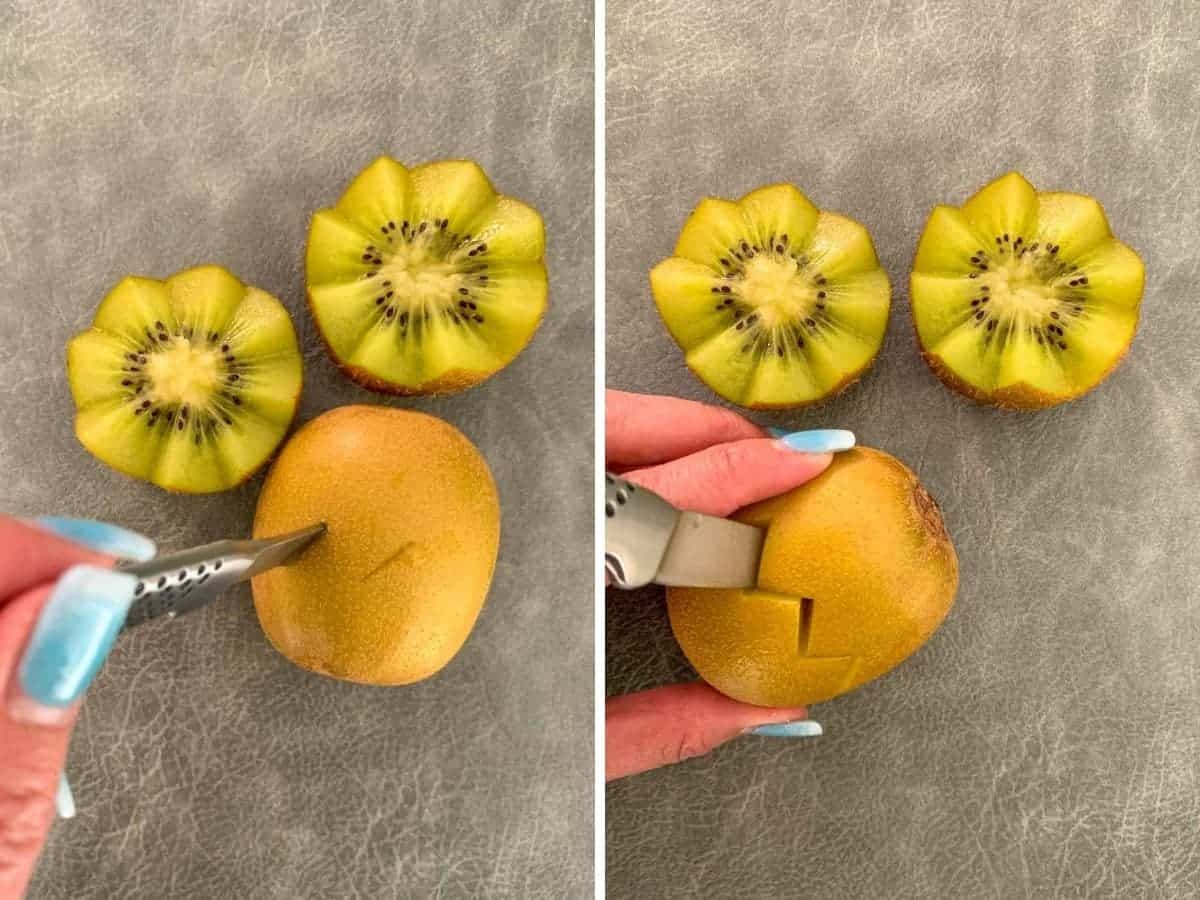
So, how to cut kiwi? Lay the kiwi fruit lengthways, flat on the chopping board. Using a sharp paring knife, pierce the kiwi at an angle in the middle of the fruit.
When the knife goes through the flesh, ensure it hits the bottom of the chopping board so that you know it’s cut right through. Do the same again, at the same angle about 2 cm apart. Continue this all the way around.
When you have completed one round, turn the knife and cut through in the opposite angle between the 2 initial cuts in the opposite direction. Essentially what you’re doing is creating a zigzag pattern all the way around the kiwi.
Once you have done so, pull the 2 ends apart and you’ll get your kiwi flower!
You can pretty much do this for any fruit. The bigger the fruit, the bigger the knife. Fruit with pits or stones, you can just cut the top end to create the same effect.
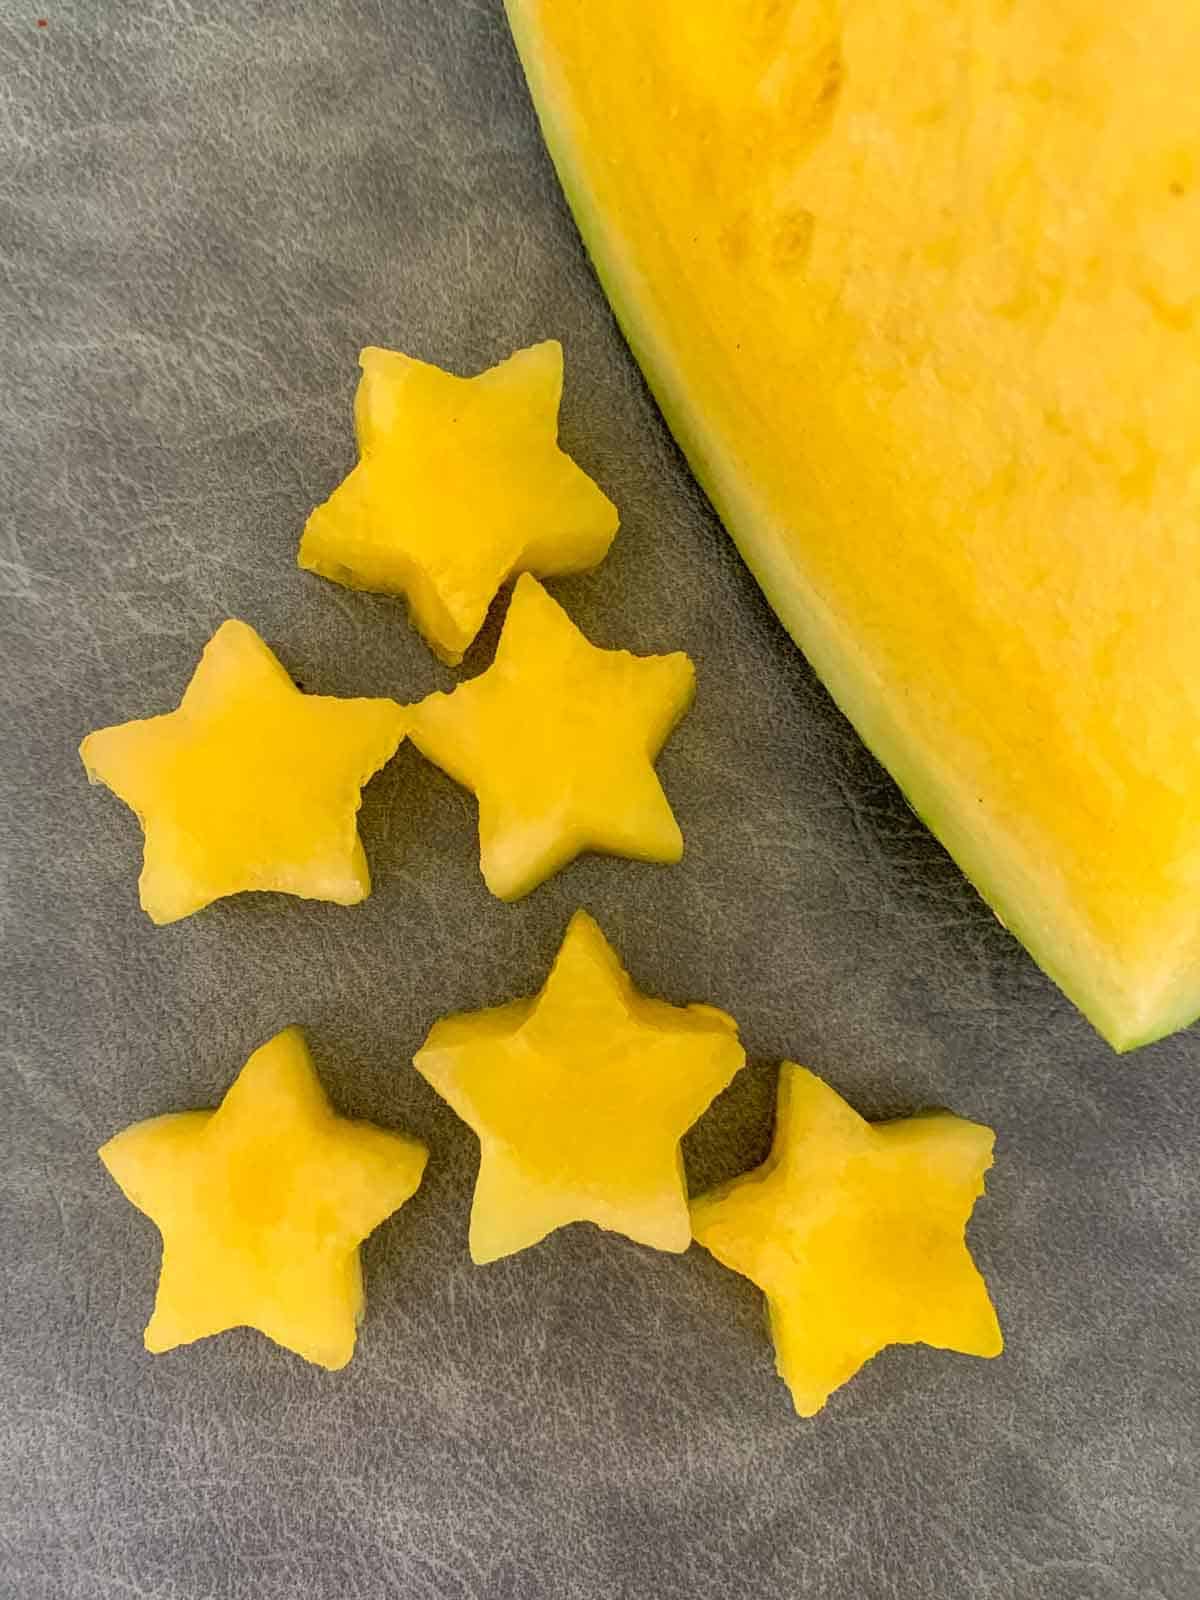
How To Use Shape Cutters for Fruit?
This is my favourite part! It’s so much fun, and if you have kids, they’ll really enjoy this process.
There are 2 things to consider when using cookie or shape cutters for fruit. Firstly, ensure the fruit is soft enough for you to push the cookie cutter through. On the other hand, they mustn’t be too soft either, as the small cookie cutters will just turn them into mush.
Secondly, slice the fruit to no more than the height of the cookie cutter. No point cutting the fruit so thick; the cookie cutter can’t reach through!
Quick tip: After using the cookie cutter to cut the desired shape, I use a chopstick to push the fruit out of the shape cutter. Works every time!
There are so many creative ways you can use the shape cutters for fruit to cut fruit decoratively.
Some interesting methods include:
- Cut out different shapes with different fruits.
- Cut out a shape from the fruit and display the fruit with the cut out portion.
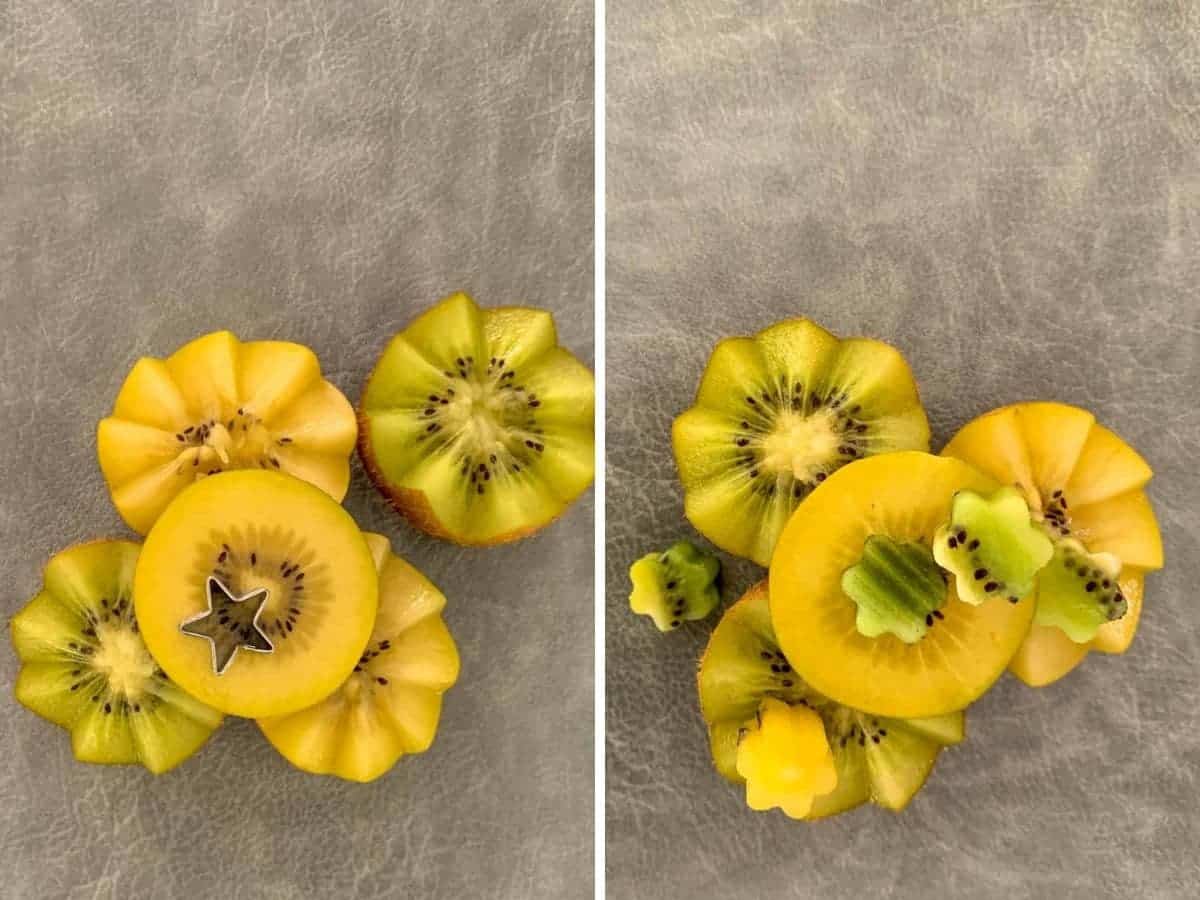
- Use the larger cookie cutter to cut out a shape, and then use a smaller cookie cutter to cut out a small shape within it.
- Exchanging fruits. Below you’ll see I cut out a floral shape from the green and gold kiwi fruits and then changed over the cut out fruit. So, the gold kiwi had a green insert and vice versa.
How to Cut A Strawberry?
To make strawberry fancy, you can create strawberry hearts with the shape cutters or fan strawberries. I have been cutting strawberry fans for years and love how it displays on a fresh fruit platter.
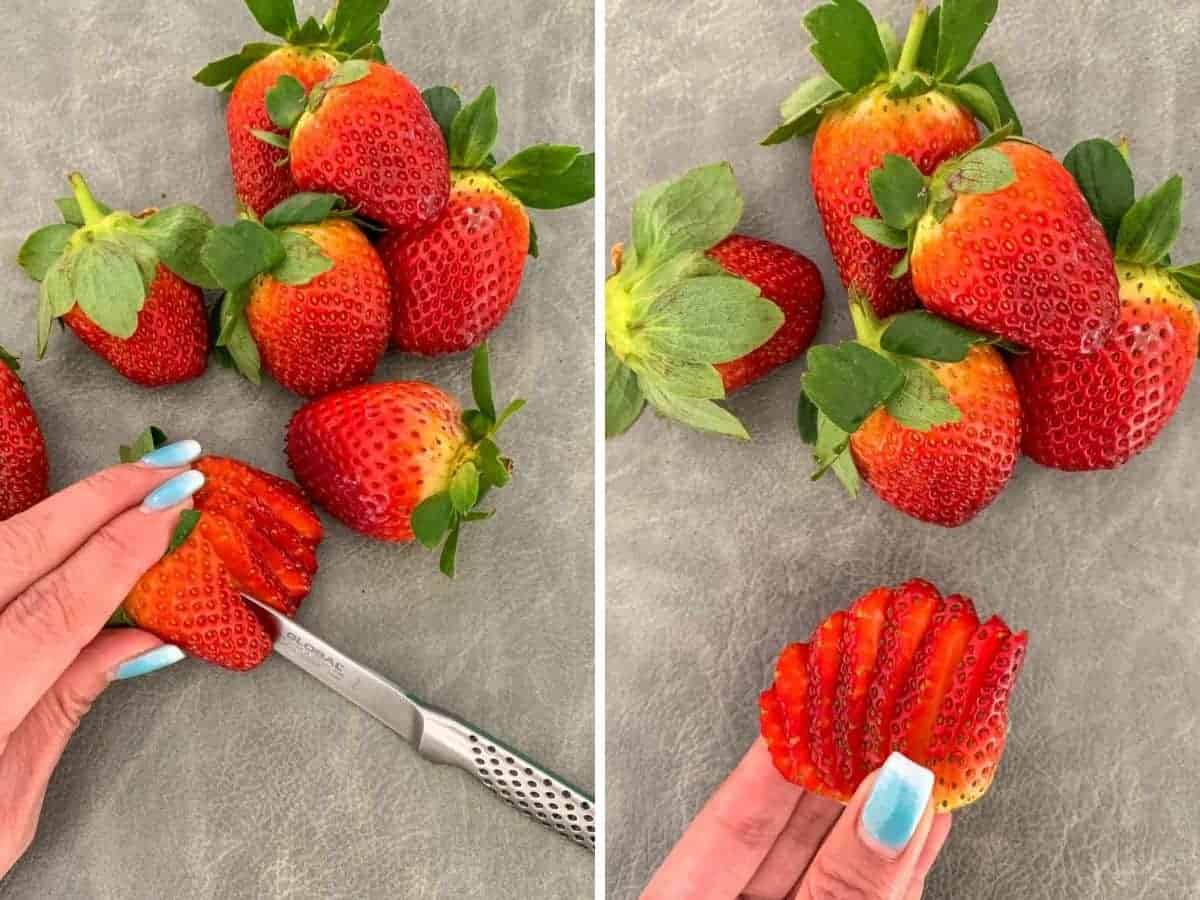
This process is easier done on larger strawberries as you’ll be able to see the spread of the slices more distinctively. You can choose to leave the leaves and stems on if you wish.
Hold the top of the strawberry steadily. Using a small, sharp knife, slice the strawberries from one end to another without cutting through to the top.
Essentially, the top end of the fruit remains intact. But you do want to get as close as possible to the top as you can.
When completed, spread them out gently and lay them flat in a fan shape.
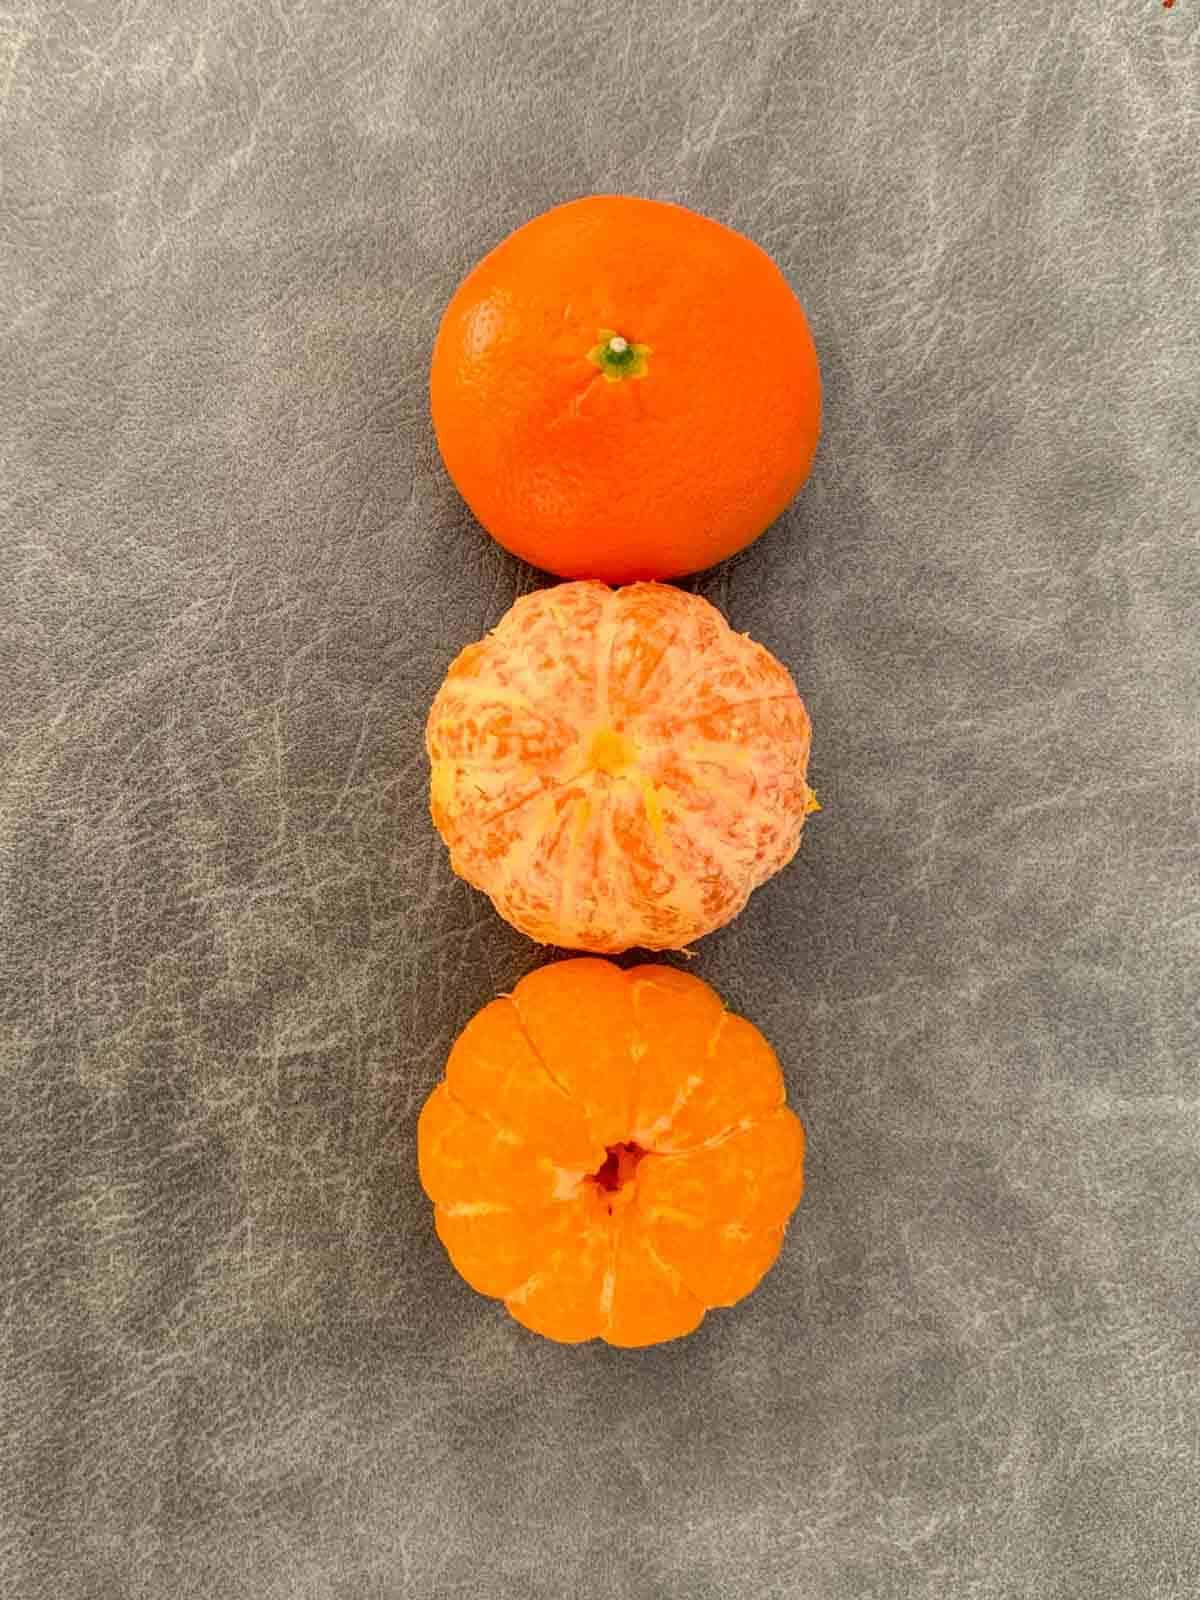
How to Remove Piths From Mandarins?
Not all fruit needs to be cut up or de-segmented. Instead, present them as a whole and you’ll get a different shape for the decorative fruit tray. In this instance, for this fruit platter presentation idea, I wanted to present the mandarins as a whole.
To make it presentable, however, I wanted to remove the pith from the mandarin fruit.
Most of the mandarins you find that have their piths removed have been done so using an enzyme. They place the peeled fruit into a bowl or jar of water. Add some of this enzyme, and it eats the pith away so that the segment is completely free of the piths and looks absolutely perfect.
Although it looks spectacular, I’m not entirely comfortable using an enzyme just to make something look pretty.
So, I just do it the old school way, and even though it’s not 100% perfect, I reckon it’s pretty close!
Using a small sharp knife (see, it pays to have a good knife!) I scrape the piths off. I start at the top of the mandarin and gently scrape downwards, and pull off the piths as I go. Even the most stubborn pith give away after a few goes.
Also, scrape from the other end of the mandarin to ensure all sides are covered. Sometimes I have to put the tip of the knife in between the segments to nick off some of the stubborn piths.
No magic method here. Just good old fashioned knife skills.
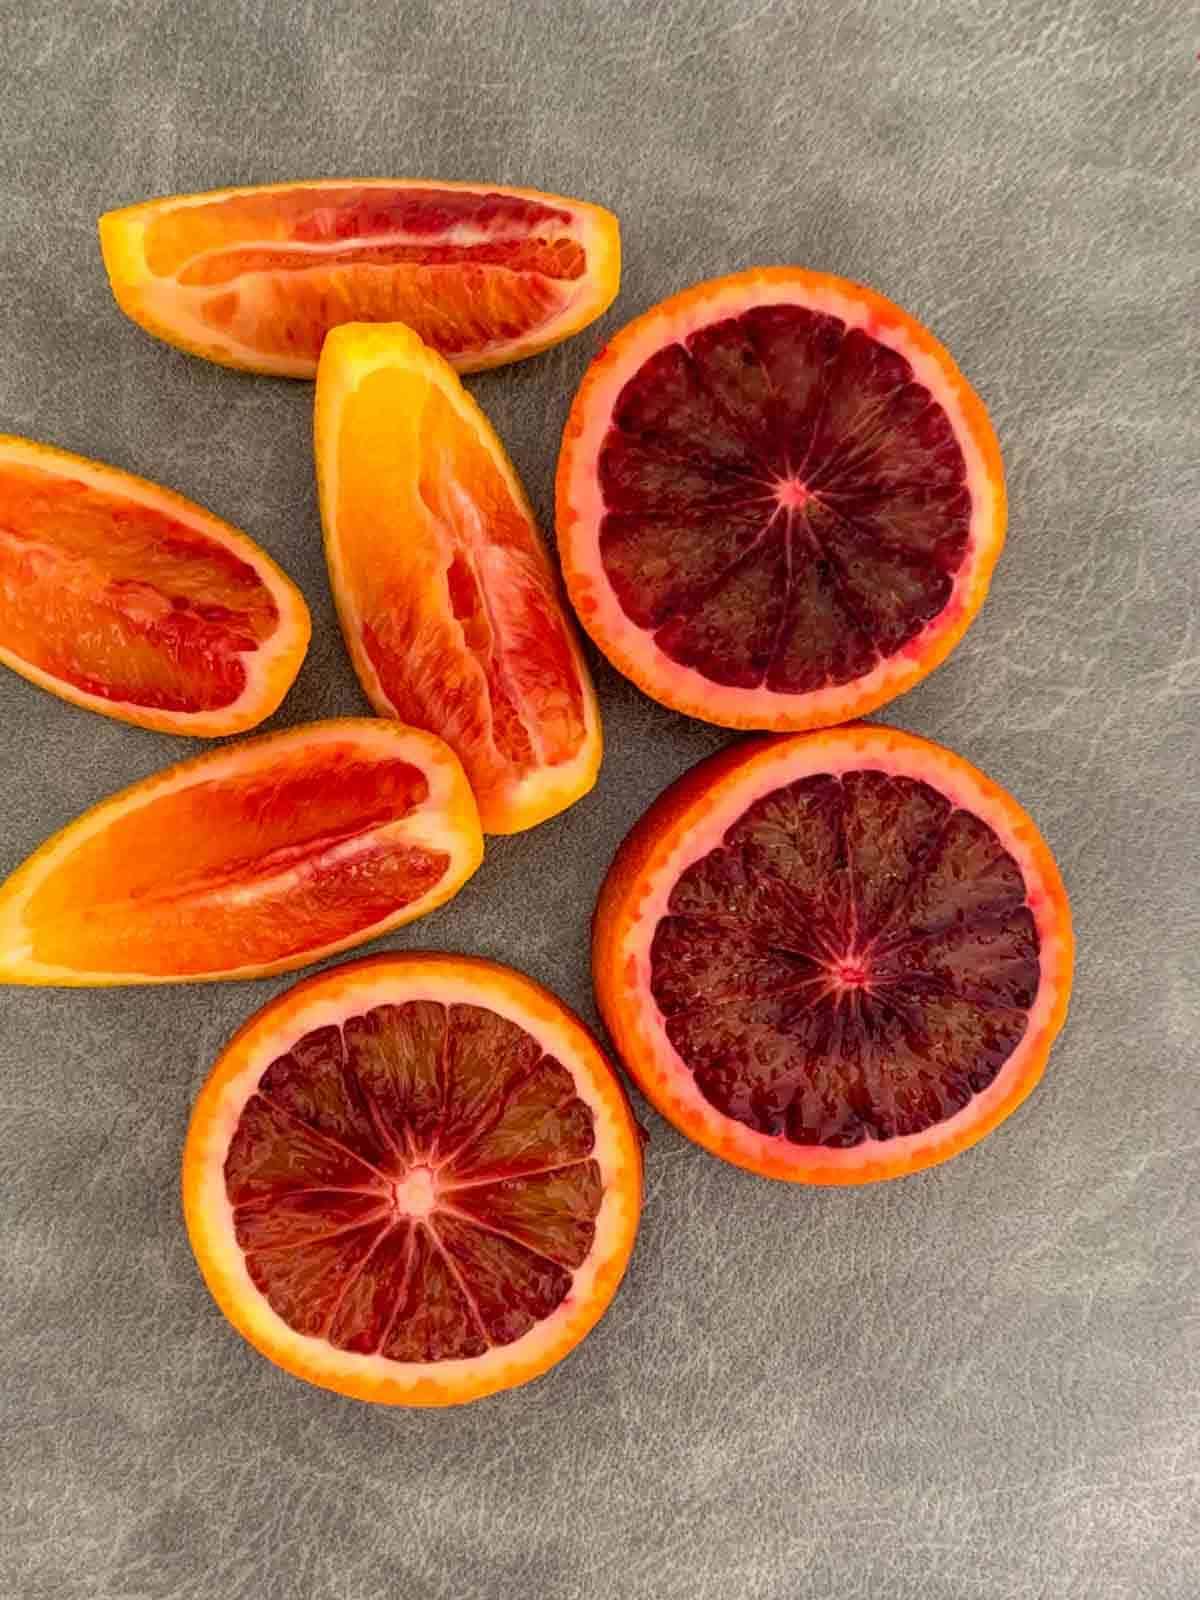
How To Cut Fruit Decoratively?
There are many ways you can add to a fruit platter presentation idea without using fancy utensils such as shape cutters for fruit.
For some reason, we automatically cut fruit in almost the same way each time. Why do oranges have to be cut in wedges all the time, for example? For this fancy fruit platter, I cut the blood oranges into wheels and wedges so that I would have different shapes and sizes.
This is where a melon baller also comes in handy. If you’re using watermelon, for example, ball some of them, use a cookie cutter for some of it, and you can also leave some of it in wedges as you would typically have them.
Balling fruit is a great way to create a shape you would not usually have for a fruit platter.
Fruit Platter Presentation Ideas with Edible Flowers.
Flowers and fruit go incredibly well together in terms of presenting a fancy fruit platter. Edible flowers are simply gorgeous and they elevate the fruit platter tremendously. Not to mention the colours it adds to it.
Recipe Overview
Flavour/Texture: This is a typical fruit platter in terms of freshness and a great combination of sweet and tart. Depending on the fruit you have selected, some are soft and some are crunchy.
Ease: Each element is not difficult by any means, but as you’re trying many different ways to cut fruit decoratively, it may not be as simple as cutting up fruit as you know it and placing them on a platter.
Time: There are many elements to this fruit presentation idea, so set aside time to put it together. Good preparation at the start will save you a ton of time.
Ingredients
These are the ingredients you need for fruit platter presentation ideas.
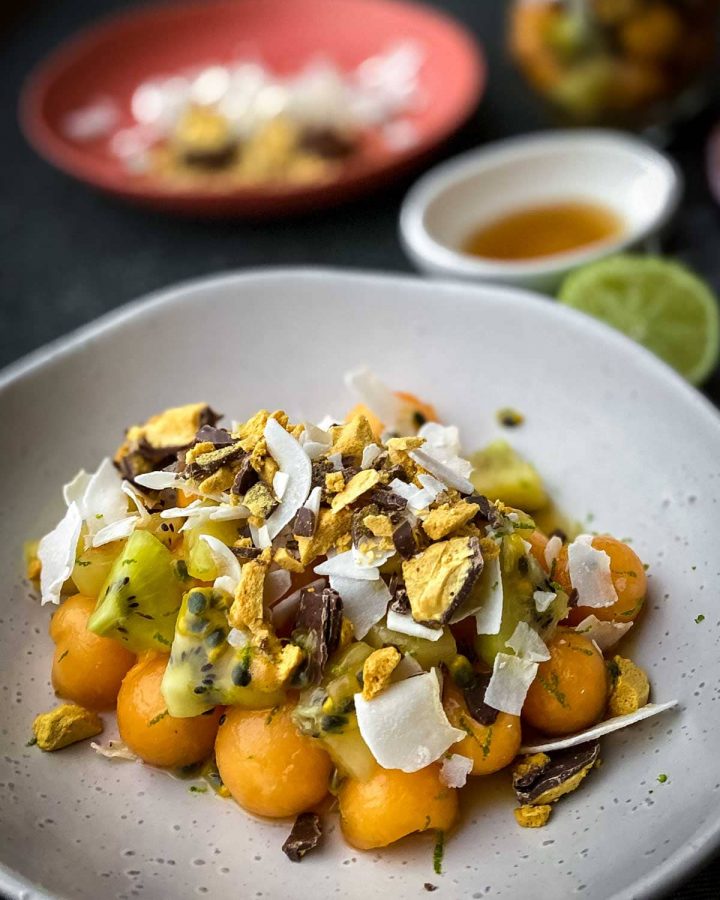
Fruit: For these fruit platter presentation ideas to work, we recommend using mandarin, oranges, gold and green kiwi fruit, blood oranges (you can use regular oranges), passionfruit, blueberries, strawberries, apples, pears, cantaloupe and yellow (or regular) watermelon.
Edible flowers: A truly simple way to elevate an everyday fruit platter to a fancy fruit platter or even a spring savoury salad such as our Herb Salad with Edible Flowers.
Variations and Substitutions
Shape cutters for fruit: You can cut all sorts of shapes to suit all different occasions. Grab some Christmas themed cutters for the holidays, ghostly Casper like cutters for Halloween and any shape for themed birthdays like fire trucks, fashion themed and even shapes of fruit.
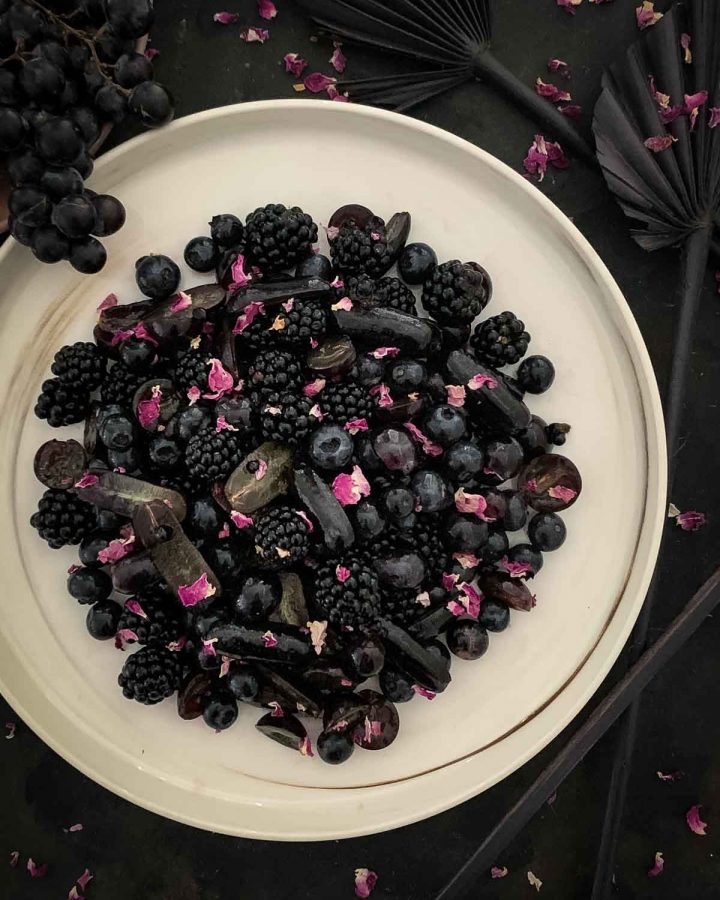
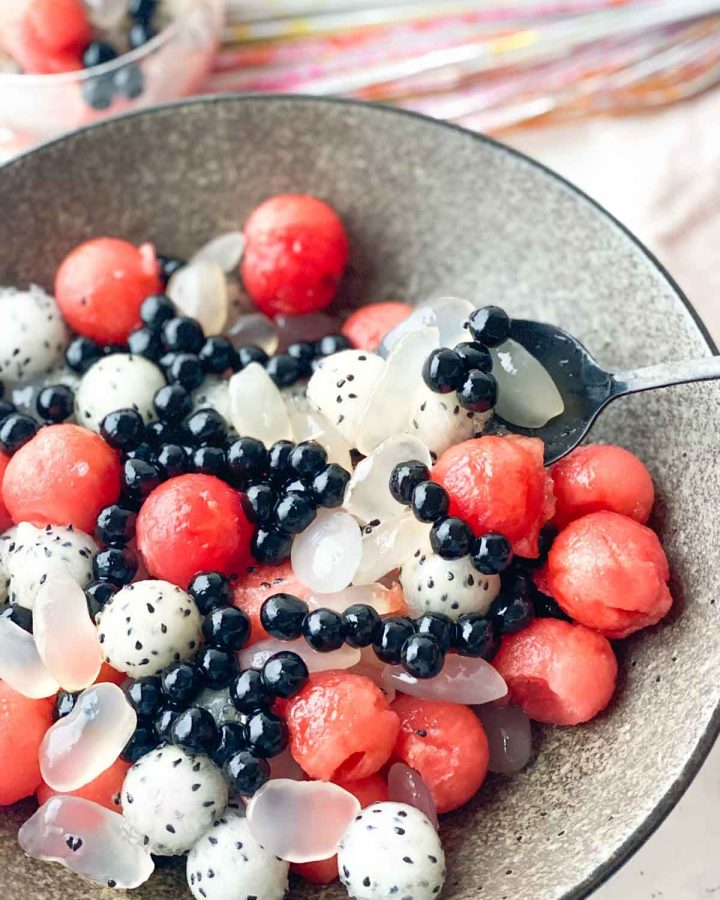
Type of fruit: There is no right or wrong fruit to use to take advantage of these fruit platter presentation ideas. You can go for a colour theme, Asian fruit only theme, or if you wish to really impress someone, try procuring really fancy fruit to create the fruit platter.
Blood orange alternative: Blood oranges can be substituted with regular oranges.
Yellow watermelon replacement: Yellow watermelon can be substituted with red watermelon.
Cantaloupe substitute: Cantaloupe can be substituted with any other melon, particularly Canary melon and Piel de Sapo melon.
Edible flower substitute: Edible flowers are just an example of what you can add to a fancy fruit platter to elevate it. You can leave them out, add candy, chocolate, decorative sprinkles and even cookies!
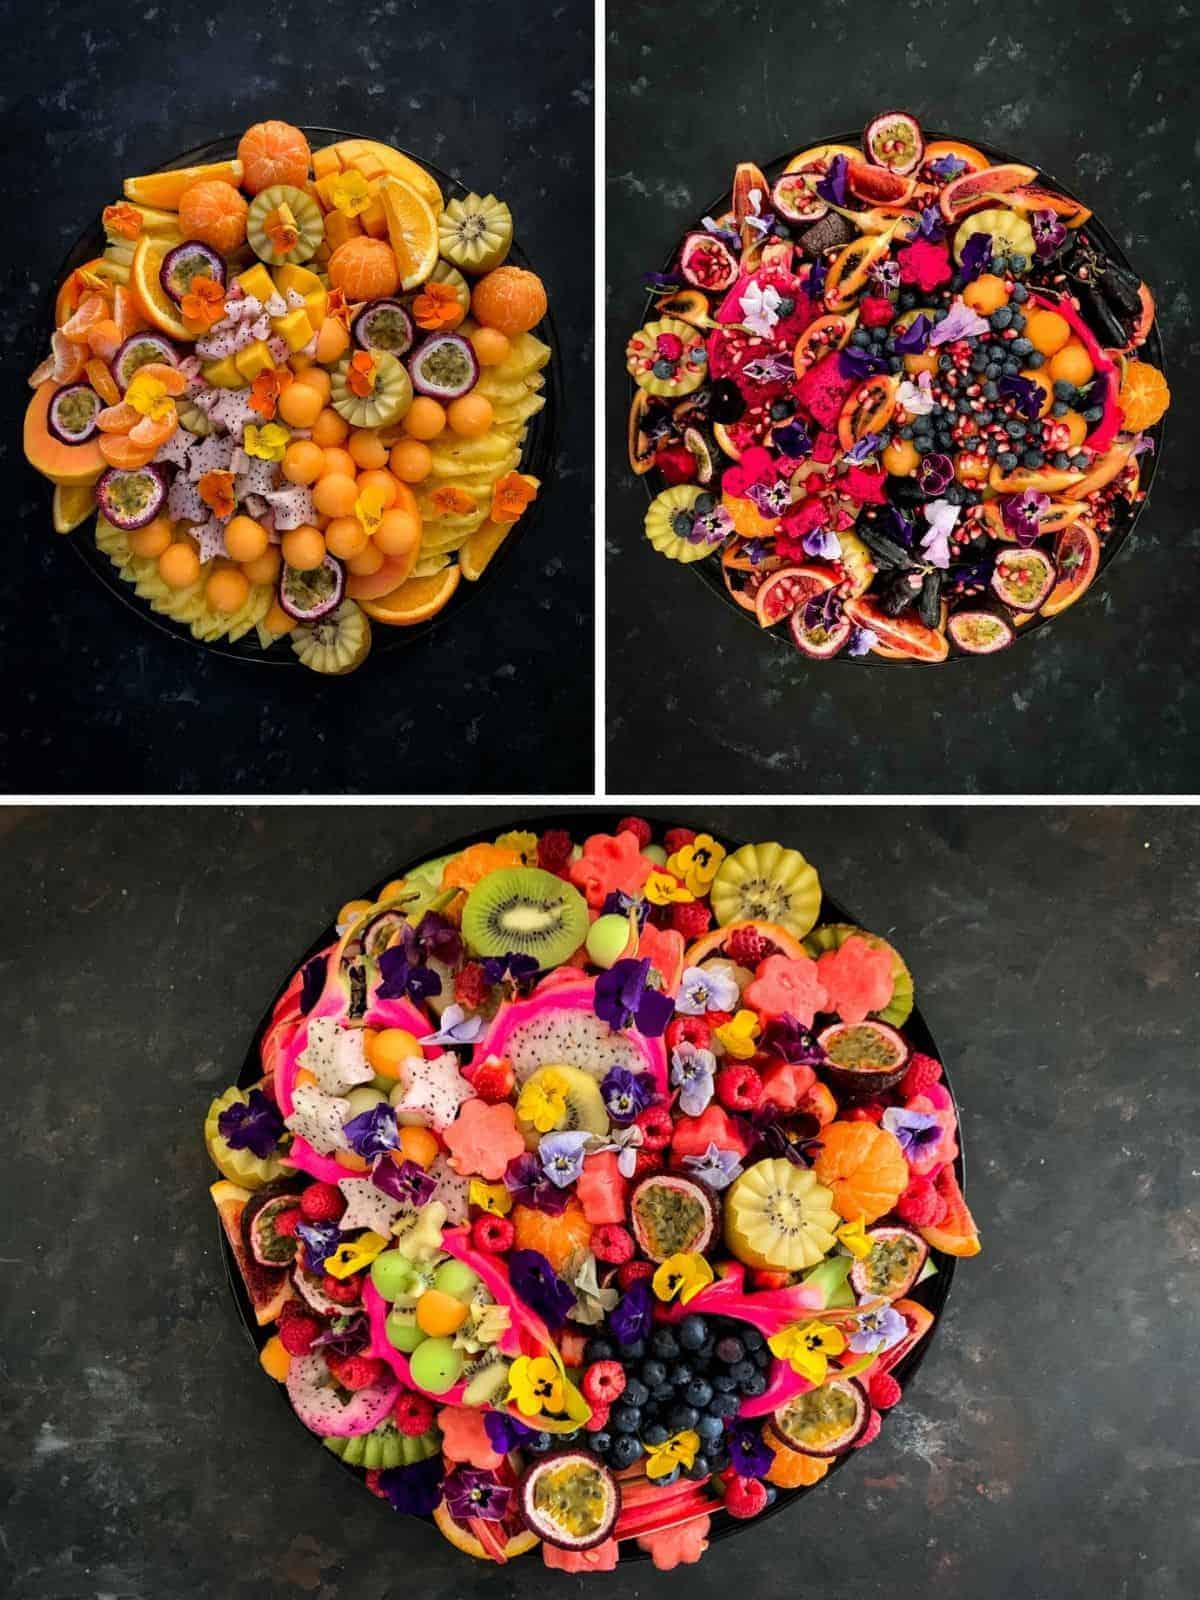
Here are some different ways to present your fruit platter.
Instructions
Step by step instructions for these fruit platter presentation ideas.
The first thing we need is a bowl for offcuts. As there will be many parts of the fruit that won’t make it into the fruit platter, we want to save all the leftovers to make a fruit salad or smoothie. Nothing should go to waste!
How To Cut Kiwi for Fruit Platter
Let’s make kiwi flowers with 2 green kiwis and 2 gold kiwis. As mentioned above, lay the kiwi fruit flat on the chopping board. Using a paring knife, pierce the kiwi at an angle right in the middle of the fruit.
When the knife goes through the flesh, ensure it hits the bottom of the chopping board so that you know it’s cut right through. Then, do the same again, at the same angle about 2 cm apart. Continue this all the way around the fruit.
When you have completed one round, turn the knife and cut through in the opposite angle between the 2 initial cuts of the opposite direction. Essentially what you’re doing is creating a zigzag pattern all the way around the fruit.
Once you have done so, pull the 2 ends apart and you’ll get your kiwi flower!
With the remaining kiwi fruit, leave the skin on and cut them into wheels. For some of the wheels, cut out shapes. Then, separate the wheels with the cutout shape and the actual cutout itself.
For the other wheels, cut out a shape from each of the gold and green kiwi fruit. Then exchange the insert so the gold has the green kiwi fruit insert and vice versa. I always get a few giggles when the kids see what I have done.
If you don’t want to leave the skin on and you’re wondering how to cut kiwi, it’s easy. Cut off the ends of the kiwi fruit. Using a peeler, peel off the skin and then slice the kiwi into nice round wheels.
If you have left over kiwi fruit you can make this gorgeous Gold Kiwi Salad with Tangelo Granita.
How to Make Strawberry Fans
For half the strawberries, hold the top of the strawberry steadily. Using a small sharp knife, slice the strawberries from one end to another without cutting through to the top. Essentially, the top end of the fruit remains intact. But you do want to get as close as possible to the top as you can.
When completed, spread them out gently and lay them flat in a fan shape.
For the remaining half of the strawberries, cut them in half or thirds, depending on how big they are, and using a cookie cutter, cut out some shapes. Set those shapes aside. Put the outer part of the fruit into the offcut bowl.
If you bought too many strawberries you can turn them into a savoury salad too. This Summer Strawberry Salad with Bocconcini and Rocket is delicious!
Prepare the Rest of The Fruit
Remove the skin and the melon seeds and discard. Cut the cantaloupe in half, lengthwise. Slice them thinly and set aside.
To remove the pith from the mandarin, use a small sharp knife to scrape the piths off. Start at the top of the mandarin and gently scrape downwards and pull off the piths as you go.
Even the most stubborn piths will give away after a few goes. Also, scrape from the other end of the mandarin to ensure all sides are covered.
Cut one blood orange into wheels and the rest into wedges. If you have extra blood oranges, you can try this Blood Orange Salad Dressing that will go so well so so many greens.
Cut the passion fruit in half.
Thinly slice the apples and pears. Place the slices in a bowl of salted water to stop it from turning brown. Pat dry when you’re ready to use.
For the yellow watermelon, cut it in half. For the first half, use the larger cookie cutter to cut out shapes. For the second half, slice them into large triangles with the rind still on as you usually would.
If you had to get a large yellow watermelon and have extras, you can also create a this Yellow Doll Watermelon Salad with Bocconcini.
How to Assemble the Fresh Fruit Platter
So how do we make this fruit salad platter? The first thing you need is a flat surface. You’ll need a platter that is flat or even a large wooden board.
Start with the watermelon. Place the large yellow watermelon triangles at the bottom of the platter to create the base.
Fill the spaces between the watermelon with the larger fruits such as blood orange wedges, cantaloupe slices, kiwi flowers and passionfruit halves.
Then strategically place all the other fruit around the platter. And by strategically, I mean spread each fruit out evenly. You don’t want one specific fruit clustered in one section.
We want a spread of colours across the board. You can sprinkle the small fruit that has been cut out in shapes along with blueberries on top.
When you’re done, place the platter on the floor. I know this sounds ridiculous, but it will allow you to see it better from top down and work out if the fruits are all placed evenly around the platter, and the colours are spread out.
Once that is done, place the edible flowers in between the fruit.
Frequently Asked Questions
You can make the fruit platter in advance, making it perfect for taking over to a friend’s house for a potluck party or a special occasion.
However, if it’s a warm day, it may need to go in the refrigerator. I know that sometimes there isn’t enough fridge space, so I pack all the fruit up separately and bring it over in a cooler bag and assemble it when it is dessert time.
Cut fruit will last about 3 days in the refrigerator if placed in an airtight container or wrapped in reusable plastic vegetable bags. However, fruit that oxidises, such as apples and pears, will brown even though they are perfectly fine to eat.
Absolutely! Making your own fruit tray is definitely much cheaper than buying pre-made fruit platters.
There is always a mark up on the cost of the fruit as it does need to cover the costs of making and packaging them. Besides, creating your own fruit tray will allow you to select the fruit you want to be included.
The best comment you can get from anyone is, “this is way too pretty to eat”! And that is precisely what you’re aiming for.
These fruit platter presentation ideas are fantastic for special occasions or if you simply want fruit to be presented beautifully.
Once you give this a go, I guarantee that you’ll look at fancy fruit platters so differently. Go on! Create the most stunning fruit salad platter you’ve ever put together!
That’s all!
More Dessert Fruit Salad Recipes
Follow us on Facebook, Pinterest, Instagram and Twitter for the latest updates!
Recipe
Fruit Platter Presentation Ideas
Ingredients
- 4 green kiwi fruit
- 4 gold kiwi fruit
- 4 mandarins
- 3 blood orange
- 2 passionfruit
- 1 punnet strawberries
- 1 red apple
- 1 pear
- ¼ yellow watermelon
- ½ cantaloupe, (rock melon)
- 1 punnet blueberries
Click on the toggle below for conversion to US Cooking Units.
Instructions
Kiwi Fruit
- Make fancy kiwi flowers with 2 green kiwis and 2 gold kiwis. Lay the kiwi fruit flat on the chopping board. Using a paring knife, pierce the kiwi at an angle right in the middle of the fruit. When the knife goes through the flesh, ensure it hits the bottom of the chopping board so that you know it’s cut right through. Do the same again, at the same angle about 2 cm apart. Continue this all the way around the fruit.
- When you have completed one round, turn the knife and cut through in the opposite angle between the 2 initial cuts in the opposite direction. Essentially what you’re doing is creating a zigzag pattern all the way around the fruit. Once you have done so, pull the 2 ends apart.
- Slice the remaining kiwi fruit about 1.5cm to 2cm thick.
- Use a cookie cutter and cut out a shape for half of those wheels. Separate the wheel with the cut out and the actual cut out fruit.
- Separate the wheel with the cut out and the actual cut out fruit.
- For the remaining wheels, use a very small cookie cutter to cut out one shape in the middle.
- Insert the green kiwi cut out shape into the gold kiwi wheel.
Rest of The Fruit
- Peel all the mandarins and leave them as a whole fruit. Using a small sharp knife, peel off all the piths.
- Slice 1 blood orange into large wheels. Cut the remaining 2 blood oranges into wedges.
- Cut the passionfruit in half.
- Slice half the strawberries into a fan shape. Hold the strawberry at the stem. Using a small sharp knife, slice the strawberries from one end to another, without cutting through to the top. Spread out the cut slices so it looks like a fan.For the remaining half of the strawberries, cut them in half (or thirds if they are big) and using a cookie cutter, cut out shapes. We will not be using the outer part of the strawberry.
- Thinly slice the apples and pears. Place the slices in a small mixing bowl of salted water to stop it from turning brown. Pat dry when you’re ready to use.
- Discard the skin and seeds of the cantaloupe. Cut in half lengthwise and slice thinly.
- For the yellow watermelon, cut it in half. For the first half use the larger cookie cutter to cut out shapes. For the second half, slice them into large triangles with the rind still on as you normally would.
Assembly
- Place the large triangles of yellow watermelon on the flat platter to form the base of the fruit platter.
- Fill the spaces between the watermelon with the larger fruits such as blood orange wedges, cantaloupe slices, kiwi flowers and passionfruit halves.
- Place the rest of the fruit evenly across the platter. Ensure the fruits are spread out evenly for colour, texture and aesthetics. Sprinkle the smaller cut out fruit and blueberries on top.
Notes
- You can of course use any fruit you wish to create this fresh fruit platter. This was just a way for us to show you how you can use different shapes and sizes to create a decorative fruit platter.
- Blood oranges can be substituted with regular oranges.
- Yellow watermelon can be substituted with red watermelon.
- Cantaloupe can be substituted with any other melon in particular Canary melon and Piel de Sapo melon.
- Flowers are of course optional but they sure do elevate that fruit platter. You can find edible flowers at any fine food grocer or you can even order them online. Of course, you can also leave them out, and instead, add candy, chocolate, decorative sprinkles and even cookies!
Nutrition
*Disclaimer: Nutritional information provided is an estimate only and generated by an online calculator.
Don’t want to miss out on a recipe? Feed your FOMO and we’ll deliver it into your inbox!
Disclaimer: This site contains affiliate links to products. We may receive a commission for purchases made through these links at no additional cost to you.
Lynette
Beautiful Fruit Platter will definately try this for Xmas . Are they Statice flower you used for decoration? They look stunning on the platter. One of my favorite flowers
The Devil Wears Salad
Thank you so much Lynette! Yes it is Statice flower. I had a couple at home a the time and thought to add it although I did have to let everyone know it wasn’t edible! But it was so pretty I couldn’t resist. Have a lovely Christmas!
Nicole Washington
This looks so fresh and vibrant. I love all the fruit in this platter.
The Devil Wears Salad
Thank you! Just creating different ways to present a fruit platter.
Jar Of Lemons
This fruit tray is definitely NOT boring! What a stunning fruit tray platter you have created!
The Devil Wears Salad
Yay! If you think that then we have succeeded!
Heidy
This Fresh fruit platter is simply beautiful. I cannot tell you enough how impressive your fresh fruit platter looks! This would be perfect for taking to my family for the holidays. Is there any chance I could talk you into making it? LOL! I am excited to make this for them. I know they are going to love it!!!
Happy Holidays!
Heidy!
The Devil Wears Salad
Hahaha! Definitely a great platter to take over to your family’s. You can actually cut it all up and get them ready separately and then assemble it there too. I usually do this and put it in a cooler with ice packs. Helpful if they don’t have a lot of fridge space. Happy holidays to you too!
Kushigalu
I have never seen such gorgeous platter. Can’t wait to share this with my family. Just amazing
The Devil Wears Salad
Thanks so much!
Colleen
This is one stunning fruit platter and I really appreciate all the great presentation and fruit cutting tips. I’m excited to give some of them a try. Thank you!
The Devil Wears Salad
You welcome Colleen! Glad it’s given you some inspiration!
Tammy
This is hands down the most beautiful fruit platter I’ve ever seen! My goodness what a work of art! I love cut outs too…such a fun idea to make it a little extra! Thanks for the tips!
The Devil Wears Salad
You welcome Tammy! Just trying to spruce up the good ol’ fruit platter. And you’re right, it’s super fun to do.
Marta
This fruit salad is not only delicious, it is absolutely beautiful. Your pictures with all the tropical fruits truly shows how much variety there is out there.
The Devil Wears Salad
You’re absolutely right! So much we can do with all the fruit available to us! I sometimes head to different shopping areas or markets just to see what other produce they may have that I don’t normally have access to.
Valerie Skinner
WOW! Move over cheese board! This is such an excellent idea and will give such a nice fresh healthy addition to all the heavy comfort foods this holiday.
The Devil Wears Salad
Exactly right Valerie! We will definitely be over eating these holidays after the year we’ve had. The fruit will be a welcome change at the end.
Chandice Probst
Now THIS is the kind of fruit platter I want to dive into! It is as gorgeous as delicious and perfect for any kind of gathering. Thank you!
The Devil Wears Salad
Thanks so much! We do find that when we present it this way, it does tend to get finished!
Leslie
I have never seen a fruit tray as beautiful as this is! This is just so stunning and creative!
The Devil Wears Salad
Thanks Leslie!
kerri
wow! this is an insanely gorgeous platter! the colors are so vibrant! the perfect addition to any party table!
The Devil Wears Salad
Thanks so much Kerri! They really are great for any party. We get so many comments everytime we make it.
Petro
What an abundance of colors & flavors! Love how you cut the fruit, it gives so much interest to a simple dish! Gorgeous, delicious & healthy!
The Devil Wears Salad
Thank you! Just wanting to create something a little different to spruce it up! And it’s fun to do too.
Jacqueline Debono
Fruit salad is never going to be the same again in my house! You have so inspired me to make this stunning fruit platter my go-to for special occasions (and maybe even not so special occasions) !
The Devil Wears Salad
They’re perfect for special occasions. I get so many comments every time I do it and it’s just fruit! Don’t even need to cook anything!
Marisa F. Stewart
This is a work of art. I really hadn’t thought of making a fruit platter like this. It looks so much better than a fruit salad where everything is jumbled together. You’ve certainly inspired me to make one of these beautiful fruit trays for brunch next Sunday.
The Devil Wears Salad
That’s great and I hope you do! Hope everyone enjoys it!
Paula Montenegro
This will certainly brighten up a holiday table, so colorful and gorgeous! And I haven’t used my melon baller in a long time lol, so I must make something as tempting as this platter!
The Devil Wears Salad
It sure would be good for Xmas! I have Xmas themed cookie cutters for the holidays. And I have found the kids tend to eat more of it too!
Aleta
Wow. I used to make platters for a living but these fruit platters? There is nothing I have ever seen that compares to these. The colours and design are out of this world beautiful. I am definitely going to be amping up my game from now on!
The Devil Wears Salad
Oh wow! That is such an amazing comment. I’m glad you think it looks great:)
Veronika
What a great idea! This will be a beautiful centerpiece at any celebration! It doesn’t just look pretty but also delicious and healthy!
The Devil Wears Salad
Thank you! Just wanted to make the platter a little more appetising and fun as opposed to just throwing all the fruit in one bowl. It sure has been popular.
Chef Dennis
what a beautiful fruit platter! Thanks for sharing all your techniques to make the platter exceptional
The Devil Wears Salad
You’re welcome! Hope you’re inspired to try some of the techniques!
Sandra Shaffer
The presentation is beautiful! I love all the ways you show how to cut the fruit. I would have never thought to use cookie cutters. My brunch menu is going to be stunning. Thank you.
The Devil Wears Salad
Hahaha! Love it! Yes, cookie cutters aren’t just for cookie dough:)
Kay
I absolutely love this, not only pleasing to the eye but something the kids can help me make and I know it will be enjoyed by them all!
Lesli
This fruit salad is so beautiful and vibrant! Not boring at all with the clever cut-outs! Love it!
The Devil Wears Salad
Aww thank you Lesli! That’s exactly what we were trying to do, amp up a simple fruit platter. Great to bring to a party!